Installing a new door can refresh the look of any space while improving its functionality and energy efficiency. Whether you’re replacing an old door or installing one for the first time, following a systematic approach is key to achieving a professional result. This guide outlines an eight-step process to help you install your door effectively and efficiently.
Step 1: Gather Tools and Materials for Door Replacement Rockville, MD
Before starting, ensure you have all the tools and materials required for the job. Being prepared will save time and reduce interruptions.
Essential tools: – Measuring tape
– Level
– Screwdriver or drill
– Hammer
– Wood shims
– Saw (if trimming is necessary)
Materials: – The new door (pre-hung or slab)
– Screws, nails, or adhesive (depending on the frame type)
– Insulation foam or weatherstripping
Step 2: Remove the Old Doors in Rockville, MD (If Applicable)
- Unscrew hinges from the doorframe to remove the old door.
- For pre-hung doors, use a pry bar to detach trim and frame components.
- Inspect the opening for damage and repair any issues before proceeding.
Step 3: Prepare the Door Opening with Help from a Door Company Rockville, MD
Ensure that your doorway is clean, level, and free from debris. Check both horizontal and vertical alignment using a level. If needed, sand down uneven areas or fill gaps with insulation foam.
Step 4: Measure for Proper Door Repair in Rockville, MD
| Measurement | How to Measure |
| Width | Distance between left & right jambs |
| Height | From floor to top of doorway |
| Depth | Thickness of wall cavity |
Compare these dimensions with those of your new door to ensure compatibility.
Step 5: Position the New Door Frame
For pre-hung doors: 1. Place the pre-hung frame in the opening. 2. Use wood shims around edges to secure alignment. 3. Verify that all sides are plumb using a level.
For slab doors: 1. Attach hinges directly onto both the slab and existing frame. 2. Confirm hinge alignment before securing screws tightly.
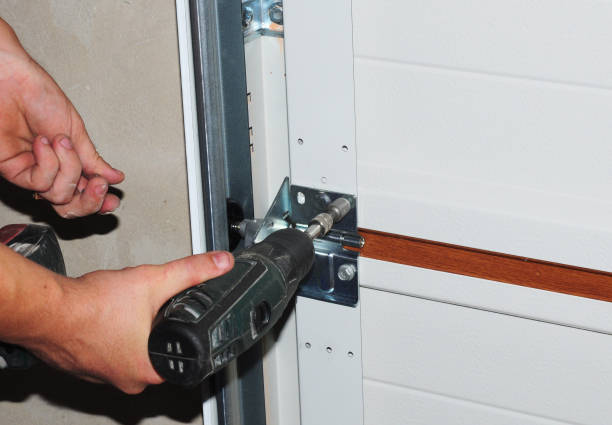
Step 6: Secure Hinges and Frame
Once aligned correctly: – Screw hinges into place firmly but avoid over-tightening. – Nail or screw through shims into surrounding studs (for pre-hung frames).
This ensures stability without bending materials out of shape.
Step 7: Add Weatherproofing Elements
To improve insulation: 1. Apply caulk along exterior trim joints to seal gaps. 2. Install weatherstripping around edges where drafts may occur. 3. Use expanding foam insulation sparingly in larger openings between wall studs.
Step 8: Test Your New Door’s Functionality
Open and close your newly installed door several times while checking for smooth motion at each hinge point as well as proper latch engagement upon closing securely.
How to Properly Measure and Align Your Door for a Perfect Fit
Accurate measurement and alignment are critical steps in ensuring your door fits perfectly and functions properly. A poorly measured or misaligned door can lead to issues such as drafts, difficulty closing, and compromised security. Whether you’re installing an interior or exterior door, following these steps will help you achieve a professional fit.
Tools You’ll Need for Measuring and Aligning
- Measuring tape (preferably one with both metric and imperial units)
- Level (4-foot level is ideal for alignment checks)
- Carpenter’s square
- Pencil or chalk for marking
- Shims
- Straightedge or ruler
Step 1: Measure the Door Opening
- Measure across the top, middle, and bottom of the door frame opening.
- Use the smallest measurement as your reference for purchasing or modifying the door to ensure it fits at its narrowest point.
- Measure from the floor to the underside of the top of the frame on both sides and in the middle.
- Again, use the shortest measurement since uneven floors can affect height.
- Measure the depth of your wall (including trim if applicable) to ensure your door jamb accommodates it properly.
| Measurement | Location | Record Value |
| Width | Top | |
| Width | Middle | |
| Width | Bottom | |
| Height | Left Side | |
| Height | Right Side | |
| Depth | Wall Thickness |
Keep this table handy to organize your measurements during installation.
Step 2: Pre-Hanging Alignment Checks
- Use a level along both vertical sides of your rough opening. Adjustments may be required if either side is not plumb.
- Place a level along where your threshold will sit to check for unevenness in flooring. If uneven, shims may be required under one end of your frame.
- Use a carpenter’s square at each corner of your rough opening to ensure proper angles.
- Position your door within its frame without securing it yet, ensuring there are consistent gaps around all edges (typically about 1/8 inch).
Step 3: Adjustments Before Installation
- Use shims behind hinges or thresholds to correct small gaps or misalignments.
- Trim areas of excess material on either side of your rough opening where needed.
- Sand down areas on wooden doors slightly if they are too tight for fitting into existing frames.
Accurate measuring and alignment contribute significantly toward a successful installation process by minimizing potential issues later on like sticking doors or improper sealing against weather elements when dealing with exterior installations
How to Properly Measure and Align Your Door for a Perfect Fit
Proper measurement and alignment are critical to ensuring your door fits seamlessly into the frame. A poor fit can lead to functional issues, drafts, and even security problems. Below is a guide to help you measure and align your door for the perfect fit.
Why Accurate Measurement Matters
Accurate measurements eliminate the risk of gaps, binding, or excessive wear on hinges and hardware. Here’s how improper measurements can affect your installation:
– Gaps: Allow air leaks that can raise energy costs.
– Misalignment: Leads to difficulty opening or closing the door.
– Hinge Strain: A poorly aligned door places unnecessary stress on the hinges, reducing longevity.
Step 1: Gather Essential Tools
- Measuring tape (preferably one with both imperial and metric units)
- Level (24-inch or longer for accuracy)
- Carpenter’s square
- Pencil or marking tool
- Notepad for recording measurements
Step 2: Measure Your Door Frame
- Start by measuring the width of the door frame at three points: top, middle, and bottom.
- Record all three values and use the smallest measurement as your final width.
- Measure from the floor (or threshold) to the top of the frame on both sides.
- Use the smaller value between these two measurements.
- Check how deep your frame is by measuring from front edge to back edge.
- This will ensure your new door isn’t thicker than your frame allows.
| Measurement Area | Method | Notes |
| Frame Width | Top, middle, bottom | Use smallest value |
| Frame Height | Left side, right side | Use smallest value |
| Frame Depth | Front edge to back edge | Ensure depth matches existing door thickness |
Step 3: Confirm Squareness of Door Frame
- Use a carpenter’s square in all four corners of the frame.
- If gaps are visible between the square and frame edges, consider shimming or repairing before installation.
Additionally, use a level vertically along both sides of the frame and horizontally across its top edge.
Step 4: Account for Clearance Gaps
- Top Gap: About 1/8 inch is typical.
- Side Gaps: Around 1/8 inch on each side.
- Bottom Gap: This depends on flooring; allow clearance if there’s carpeting or rugs beneath.
Record these allowances along with your initial measurements so you can adjust if needed during installation.
Tips for Alignment During Installation
- Pre-hang doors in their frames whenever possible—it simplifies alignment.
- Use temporary shims while securing hinges to maintain even gaps.
- Check alignment frequently using a level as you secure each hinge screw.
- Tighten screws incrementally rather than fully at once; this prevents pulling parts of the door out of alignment.
By dedicating time upfront to proper measurement and alignment practices, you set yourself up for a hassle-free installation process while ensuring long-term functionality of your door system.

Step-by-Step Process for Installing the Door Frame and Securing It
Installing the door frame is a critical step in ensuring that your door operates smoothly and fits securely within the opening. A properly installed frame not only provides structural support but also helps with insulation, durability, and functionality. Below is a detailed guide to walk you through this process.
Tools and Materials You’ll Need:
- Tape measure
- Level (2-foot or longer)
- Hammer or nail gun
- Power drill with screwdriver bits
- Pry bar
- Miter saw or handsaw
- Pre-hung door frame or separate jamb pieces
- Shims (wood or composite)
- Galvanized nails or screws
- Wood glue (optional)
- Insulation foam or caulk
- Trim molding
Preparing the Rough Opening:
To install the door frame correctly, it’s important to start with proper preparation of the rough opening.
- Inspect the Rough Opening: Check that the opening is square, level, and plumb. Measure diagonally from corner to corner; both measurements should be equal. If they’re not, adjustments may be necessary.
- Clear Debris: Remove any nails, old sealant, or obstructions within the rough opening.
- Add a Moisture Barrier (if needed): For exterior doors, apply weatherproof flashing tape around the perimeter of the rough opening to prevent moisture infiltration.
- Check Your Frame Size: Ensure that your door frame fits snugly into the rough opening with sufficient space for shims on all sides (approximately 1/8″–1/4″).
Installing the Door Frame:
- Position the Frame in Place: Place the bottom of your pre-hung door unit onto a sill pan (if used) or base of the rough opening. Tilt it upright until it fits flush against one side of the wall framing.
- Use Shims to Achieve Proper Alignment: Insert shims at key points along both sides of the jambs—typically near hinges and latch areas—to create a snug fit while maintaining plumb alignment.
- Secure Hinged Side Temporarily: Drill pilot holes through both hinge-side jambs and shims before driving screws partially in place as temporary fasteners.
- Check for Leveling & Squareness: Use your level along vertical and horizontal edges of each jamb piece during every adjustment phase so there’s no sagging misalignment later on when swinging open-close cycles occur frequently over time usage lifespan terms considerations included therein factors impact overall quality satisfaction results performance expectations benchmark standards usage metrics objectives project scope targets achieved deliverables defined goals realized accordingly herein set forth documentation compliance adherence ensured throughout construction stages protocols monitored thoroughly…
Troubleshooting and Solving Common Door Installation Challenges
Door installation is a task that requires precision, planning, and proper execution. However, even with the best preparation, challenges may arise during the process. Identifying and addressing these issues proactively can save time, effort, and frustration. Below are some common door installation challenges and how to troubleshoot them effectively.
1. Door Doesn’t Close Properly
A door that doesn’t close or latch correctly can be caused by several factors:
– Misaligned Hinges: Check if the hinges are properly aligned. Loose or uneven hinges can cause the door to sag or tilt, preventing it from closing securely.
Solution: Tighten the screws on the hinges or replace any worn-out screws with longer ones for better grip. Consider shimming behind the hinge plate if necessary to correct alignment. – Warped Door Frame: An uneven frame can distort how the door closes.
Solution: Use a level to ensure both sides of the frame are plumb and make minor adjustments as needed.
2. Uneven Gaps Around the Door
Large gaps at certain points while other parts of the door feel tight against the frame are a common issue. – Improper Shimming During Installation: Inconsistent shimming causes alignment issues in many cases. Solution: Remove any existing trim carefully to gain access to shims behind the frame. Adjust or add shims until there’s an even gap along all edges when measured.
| Gap Size | Recommended Fix |
| Less than 1/8 inch | Minor sanding or readjusting screws |
| More than 1/4 inch | Add new shims or rehang |
3. Drafts Coming Through
Noticeable drafts around your newly installed door typically result from poor sealing or improper weatherstripping placement. – Worn Weatherstripping: Inspect for damaged weatherstripping materials that may need replacing. – Improper Threshold Adjustment: If air flows under your door excessively despite weather seals this could indicate poorly adjusted thresholds height overtime guidance etc..
Boosting Home Aesthetics with a New Front Door Installation
A front door is more than just an entry point to your home—it serves as a focal feature that can significantly impact the overall aesthetics of your property. Installing a new front door not only enhances curb appeal but also adds value to your home. Whether you’re replacing an old, worn-out door or upgrading to match modern trends, here are some key aspects to consider when boosting home aesthetics with a new front door.
Choosing the Right Style and Material
- Classic Wooden Doors:
Timeless and elegant, solid wood doors add warmth and sophistication. They come in various finishes, from natural woodgrain looks to painted options. - Modern Steel or Fiberglass Doors:
These doors offer a sleek appearance while maintaining durability. They often feature clean lines, minimalist designs, and energy-efficient cores. - Glass Panel Doors:
Incorporating glass panels (clear or frosted) allows natural light into the entryway while offering a contemporary feel.
| Material | Benefits | Best Suited For |
| Wood | Elegant and traditional look | Classic or rustic homes |
| Steel | Durable and secure | Modern or industrial designs |
| Fiberglass | Low maintenance, energy-efficient | Contemporary homes |
| Glass panel | Adds light; aesthetic appeal | Modern or transitional styles |
Selecting the Perfect Color
- Match it with your existing exterior palette for a cohesive look.
- Opt for bold colors like red, blue, or yellow if you want your door to stand out.
- Stick with classic hues such as black, white, or dark brown for timeless elegance.
- Use contrasting trim colors to highlight architectural features.
Adding Decorative Touches
- Hardware Upgrades: Choose high-quality handle sets, knockers, and hinges in finishes like brass, chrome, or matte black.
- Side Panels: Install sidelights on either side of the door to create balance and symmetry.
- Transom Windows: Add a transom window above the frame for extra light and character.
- Wreaths & Seasonal Decor: Use wreaths or other temporary decorations to keep your entryway inviting throughout the year.
Enhancing Curb Appeal Beyond the Door
- Repaint surrounding trims and frames if needed.
- Install modern lighting fixtures near the doorway for improved ambiance at night.
- Add potted plants or a doormat that complements your new door’s design.
These seemingly small details work together with your new door to create an inviting entrance that reflects both personal style and functionality.
By carefully selecting materials, colors, and accessories during installation planning, you’ll not only improve aesthetics but also make a lasting impression on anyone who visits your home.
- Step-by-Step Guide to Door Repair Rockville, MD: Tips for Homeowners
- Door Installation Rockville, MD: A Complete Guide to Installing a Door in 8 Steps
- Expert Tips and Tricks for Door Replacement Rockville, MD
- 6 Essential Factors to Consider When Replacing Doors in Rockville, MD
- Fixing Common Doors Rockville, MD Problems: Causes and Solutions
- Choosing the Right Door Installation in Rockville, MD for Your Needs
- Step By Step Guide to Expert Entry Door Installation in Doors Rockville, MD